Handling different type of errors in React Native
Why we need this?
Statistics show “that 89% of the time that people spend online with their mobile phones, is on mobile apps”(https://www.dotcominfoway.com/mobile-app-usage-statistics/).
Considering that “nearly 22% of apps downloaded are never used more than once”, in order to minimise user bounce rate, we should focus on providing a good user experience, especially when it comes to error handling.
Error management is sometimes neglected in application development, but it is really important to let the user know when something went wrong and even more important is the way we do that.
The main objective of this article is handling errors that we get from API requests in react-native.
From my point of view there are 4 big main types of errors:
1. Permanently displayed errors
The user has to be constantly conscious that these errors exist (eg.: error at loading the entire content of the screen, internet connexion errors).
2. Temporarily displayed errors on a particular screen
The user has to be informed about this errors only if they are on a particular route (eg.: loading a modal with an image gallery or it tries to login)
3. Temporarily displayed errors not tied to a screen
The user has to be informed about these errors no matter where they are in the app (eg.: if the user cancels an order and then quickly moves to another screen, if the order was not canceled, we have to display the error everywhere in the app)
4. Errors that don’t need notifications** (eg.: rating an item)
Usually:
- Type 1 errors are displayed on the entire screen or small parts of the screen permanently
- Type 2 & 3 errors are displayed for a short time, in the form of an in-app notification at the top of the screen
Handling these types of errors can sometimes become pretty complicated and this can lead to complex and hard-to-read code.
How to implement it
In our attempt of improving error handling, we’ll start implementing an app to “sweeten” the idea of errors.
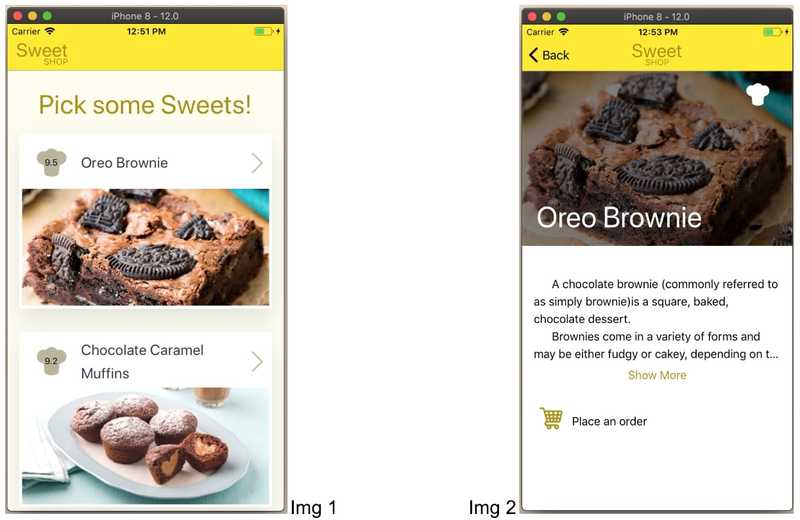
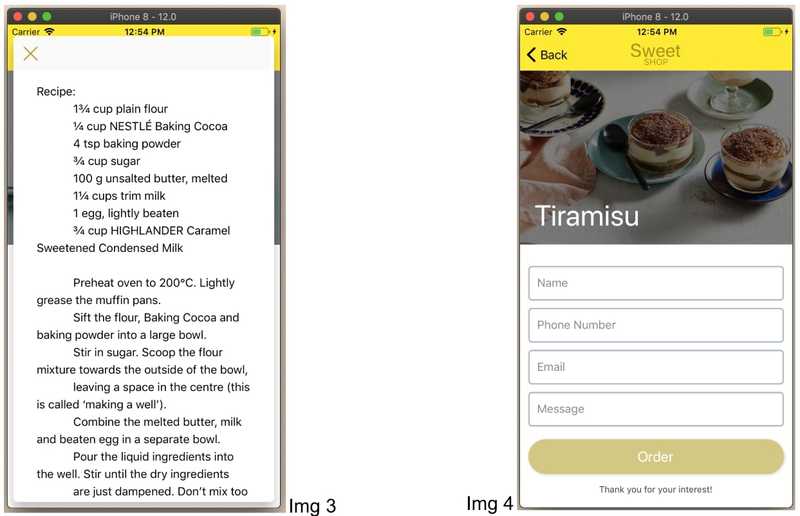
Suppose we want to implement an application for a local pastry, willing to share its secrets with their clients. The app will contain a list of products from the pastry menu (Img 1), each product will have its details page (Img 2), recipe page (Img 3) and order placement page (Img 4).
Let’s classify our errors according to the routes:
- Home Page - request to load sweets list: type 1 error
-
Item Page - (usually there’s a request to load item details, but we won’t do it this way)
- Recipe Page - request to load recipe: type 2 error (if the user leaves the page, it doesn’t matter if the load recipe request failed)
- Place Order Page - request to place order at submit: type 3 error (if the user leaves the page, we still need to be display an error if the place order request failed)
Great, now we can start the implementation!
1. State structure
a) Make sure you always have access to the active route in navigator (the screen that the user is currently on - I
created a special reducer for it and use it at point 3, in getRequestStatuses). (Another way to do it: https://reactnavigation.org/docs/en/redux-integration.html)
Also, make sure that for screens that can show up for multiple items (like Item Page) you also keep the item id on state:
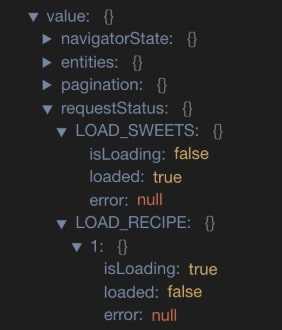
b) Create a special reducer for requests, so that all (requests) actions that pass through this reducer make corresponding changes to the state (update isLoading, loaded & error) - in this way we will have all the information about the API requests in one place.
During a request, the state will look like this:
As you can see, we have:
-
LOAD_SWEETS - request to load list of sweets - has:
- isLoading: false (request is finalized)
- loaded: true (request is successfully finalized)
- error: null (request has not failed)
-
LOAD_RECIPE - request that can be made for all the items in the list - because we want to track the status for each individual item, we use the item id as a key to the specific request: [requestId] - request to load recipe for an item (requestId = item_id) - has:
- isLoading: true (request is in progress)
- loaded: false
- error: null
For this, we must send item_id as a parameter at dispatch:
	dispatch({
		type: ‘LOAD_RECIPE,
		payload: { requestId: item_id }
});
Create the reducer like this:
export const apiRequestType = '_REQUEST';
export const apiSuccessType = '_SUCCESS';
export const apiFailureType = '_FAILURE';

const initialState = {};

const apiRequestTypes = {
 request: apiRequestType,
 success: apiSuccessType,
 failure: apiFailureType,
};

// if action.type is an API request, it will return _REQUEST, _SUCCESS or _FAILURE depending on API request status
// otherwise, will return false
const getApiRequestActionType = type =>
 (type.endsWith(apiRequestType) && apiRequestTypes.request) ||
 (type.endsWith(apiSuccessType) && apiRequestTypes.success) ||
 (type.endsWith(apiFailureType) && apiRequestTypes.failure);

// this function will return the action type removing one of the suffixes: _REQUEST, _SUCCESS, _FAILURE
const getApiRequestType = (type, actionType) => type.substring(0, type.lastIndexOf(actionType));

// in order to add any items to request status, you have to dispatch actions
// that are prefixed with _REQUEST, _SUCCESS, _FAILURE
const requestStatus = (state = initialState, action = {}) => {
 const apiRequestActionType = getApiRequestActionType(action.type);

 if (apiRequestActionType) {
   let requestApiValue = {};
   const apiRequestType = getApiRequestType(action.type, apiRequestActionType);
   const { loaded, requestId } = action.payload || {};

   // according to action type status, we populate the state
   switch (apiRequestActionType) {
     case apiRequestTypes.request:
       requestApiValue = {
         isLoading: true,
         loaded: false,
         error: null,
       };
       break;
     case apiRequestTypes.success:
       requestApiValue = {
         isLoading: false,
         loaded: loaded || true,
         error: null,
       };
       break;
     case apiRequestTypes.failure:
       requestApiValue = {
         isLoading: false,
         loaded: false,
         error: action.payload.error,
       };
       break;
     default:
       break;
   }

   // if we have requestId parameter, it means that we can make this type of API request for multiple items
   // so we use the id as a key for the request status
   if (requestId) {
     return {
       ...state,
       [apiRequestType]: {
         ...state[apiRequestType],
         [requestId]: requestApiValue,
       },
     };
   }

   return {
     ...state,
     [apiRequestType]: requestApiValue,
   };
 }

 return state;
};

export default requestStatus;
2. Create a configuration file to define which error should appear on which screen
export const configuration = {
 LOAD_SWEETS: [],
 LOAD_RECIPE: ['SweetItem'],
 PLACE_ORDER: ALL_ROUTES
};
Each key represents action’s type and each value is a string (ALL_ROUTES - which means that error has to appear no matter on which screen we are) or an array of all the routes where that error should be displayed (empty array means no screen).
“SweetItem” is one of the routes:
import React from "react";
import { createStackNavigator, createAppContainer } from "react-navigation";
// import screens

export const AppNavigator = createStackNavigator({
 SweetShop: { screen: SweetShop },
 SweetItem: { screen: SweetItem },
 PlaceSweetOrder: { screen: PlaceSweetOrder },
},   {...}});

export default createAppContainer(AppNavigator);
3. Create selectors
- Type 1 errors - sample selectors:
export const getIsLoadingSweets = (state) => {
 const sweetsStatus = requestStatus(state, c.LOAD_SWEETS_CONSTANT);

 return sweetsStatus && sweetsStatus.isLoading;
};

export const getLoadedSweets = (state) => {
 const sweetsStatus = requestStatus(state, c.LOAD_SWEETS_CONSTANT);

 return sweetsStatus && sweetsStatus.loaded;
};

export const getLoadSweetsError = (state) => {
 const sweetsStatus = requestStatus(state, c.LOAD_SWEETS_CONSTANT);

 return sweetsStatus && sweetsStatus.error;
};- Type 2 & 3 errors - complex:
import { checkRoute } from 'src/reducers/global/screenErrorConfig';

const getCurrentRoute = (state) => state.navigatorState.currentRoute;
const getCurrentRouteRequestId = (state) => state.navigatorState.requestId;

const filterRequestStatus = (requestStatus, currentRoute, currentRouteRequestId) => {
 const filteredLoading = {};
 const filteredLoaded = {};
 const filteredErrors = {};

 const handleSingleApiRequest = (key, value) => {
   const { error, loaded, isLoading } = value;

   if (error && error.message) {
     filteredErrors[key] = error;
   }

   if (loaded && loaded.length) {
     filteredLoaded[key] = loaded;
   }

   if (isLoading) {
     filteredLoading[key] = true;
   }
 };

 const handleMultipleApiRequest = (key, value) => {
   Object.keys(value).filter(innerKey => {
     const innerValue = value[innerKey] || {};

     // check if the requestId parameter is the same with current route requestId
     // as I pointed out above (at 1.a.)
    // because we don't want to display the error from item1 if we are on item2's screen
     if (checkRoute(key, currentRoute, innerKey, currentRouteRequestId)) {
       handleSingleApiRequest(`${key}__${innerKey}`, innerValue);
     }
   });
 };

  Object.keys(requestStatus).filter(key => {
    if (checkRoute(key, currentRoute)) {
      const value = requestStatus[key] || {};

      // This checks if the api request is not a request that can be done for multiple items (eg.: LOAD_SWEETS)
      if (value.hasOwnProperty('isLoading')) {
        handleSingleApiRequest(key, value);
      } else {
        // this is for API requests that can be done for multiple items (eg.: LOAD_RECIPE)
        handleMultipleApiRequest(key, value);
      }
    }
  });

  return {
    loading: filteredLoading,
    loaded: filteredLoaded,
    errors: filteredErrors,
  };
 };

 export const getRequestStatuses = (state) => {
  const requestStatus = state.requestStatus;
  const currentRoute = getCurrentRoute(state);
  const currentRouteRequestId = getCurrentRouteRequestId(state);

  return filterRequestStatus(requestStatus, currentRoute, currentRouteRequestId);
 };
export const checkRoute = (key, route, innerKey, currentRouteRequestId) => {
if (configuration[key] === ALL_ROUTES) {
return true;
}
const currentRoute = configuration[key].indexOf(route) >= 0;
if (innerKey && currentRouteRequestId) {
return currentRoute && innerKey.toString() === currentRouteRequestId.toString();
}
return currentRoute;
};Using action type, the current route and the previously created config file(point 2), checkRoute decides if the selector should return the status of that action.
For example, if we are on Item Page, the selector will return objects like:
{
 errors: {},
 loaded: {},
 loading: { LOAD_RECIPE__1: true },
}
{
errors: {
LOAD_RECIPE__1: { message: "The recipe could not be loaded" }
},
loaded: {},
loading: {},
}If we are on Home Page, the selector will return:
{
errors: {},
loaded: {},
loading: {},
}because LOAD_RECIPE has to be displayed only on Item Page, so on Home Page we don’t care about the status of this action.
4. Connecting to redux a component that wraps Navigator
- Note: type 1 errors do not need this, those can use the simple selectors on the particular routes where the error has to be permanently displayed:
class HomePage extends React.PureComponent {
...
render() {
const {
loadingSweets,
loadSweetsError,
} = this.props;
if (!loadingSweets && loadSweetsError) {
return (<ErrorScreen />);
}
return (...);
}
}- Type 2 & 3 errors: So, componentWillReceiveProps will contain:
this.props:
{
errors: {},
loaded: {},
loading: { LOAD_RECIPE__1: true },
}nextProps:
{
 errors: {
   LOAD_RECIPE__1: { message: "The recipe could not be loaded" }
 },
 loaded: {},
 loading: {},
}For all the requests that were in progress, we check if the request is done (errors object or loaded object contains the request) and display it.
For example, this.props.loading.LOAD_RECIPE__1 was true, and nextProps.errors.LOAD_RECIPE__1 contained an error message, which means that the request failed.
// imports
class AppView extends Component {
 componentWillReceiveProps(nextProps) {
   const { loading } = this.props;
   const { errors, loaded } = nextProps;

   Object.keys(loading).forEach(key => {
     if (errors[key]) {
       DropdownHolder.alert('error', errors[key].message);
     } else if (loaded[key]) {
       DropdownHolder.alert('success', loaded[key]);
     }
   });
 }

 render() {
   return (<AppNavigator {...} />);
 }
}

const mapStateToProps = state => {
 return getRequestStatuses(state);
};
const mapActionsToProps = dispatch => bindActionCreators({}, dispatch);

export default connect(mapStateToProps, mapActionsToProps)(AppView);
Aaaand we’re done!
Here are some use cases to test our app:
1. Home Page List not loading
2. Home Page List was loaded
a. User goes to Item Page (Oreo Brownie is hardcoded to fail)
i. Open Recipe
1. Wait 5 seconds - the error will show up.
2. Start counting, close recipe, go back to Home Page - the error won’t show up.
ii. Open Place an Order screen and submit order.
1. Start counting, go back to
a. Home page
b. Item Page
c. Home Page + navigate to another Item Page
- the error will always show up
Final thoughts
Now that you’ve learned how to handle errors based on error types, I invite you to check a complete example I have shared for you on our Github. Looking forward to getting your input!
https://github.com/MCROEngineering/react-native-error-handling


