How to best engineer your website
As we have just launched the new MCRO website, I thought that it would be a nice idea to point out some of the thoughts that came to me in general about serving a presentation website. A lot of companies i know, regardless if they are in the tech industry or not, the first option that crosses their minds when it comes to creating a website is to use Wordpress. Why would that be? Most likely because everything is made so easy - just install a free solution of a CMS that will create everything for you in just 5 simple steps by filling out some forms with information about your database and host configuration. Once you have uploaded a logo, chosen a theme and put in some content, BOOM you got the website to show up and work! It’s funny how simple it all sounds. The problem is that nobody thinks about all the pitfalls that can come with it.
From security to performance, through a lot of buggy plugins Wordpress can fail in many possible ways. Not to mention the fact that scaling up in case of a high reliability website will cause a lot of trouble and will take a lot of DevOps effort to just overcome the downsides one by one. Even with all this additional effort it’s still not guaranteed that the website will stay up in case of an attack. Another reason you would use Wordpress might be that you’re coming from a PHP development background. If you do this however, it still says a lot about you. Another thing to consider is that you will still need Javascript to develop a fully interactive website. We are in 2018 and nowadays everyone wants a super fast single page application to route all your pages and provide support for SEO at the same time. We do know that Google nowadays does Javascript parsing to SPAs, but this still won’t be enough for a good SEO ranking.
Here’s a good way to do it
If you are a Javascript developer you most likely want to have a fullstack javascript solution for developing your site, so you can use a smart combination of Node + React that will offer the possibility to make your site highly interactive and in the same time very SEO friendly. GatsbyJS comes fully equipped with all the tools that you need to best engineer your static site in the right way. The upside is that you can still use your CMS data at the same time, Wordpress can give you the data content through an API that can further be served using Gatsby. You could use data from any kind of CMS, Markdown that gets translated into html, JSON, YAML and/or other formats, anything that can be further mapped into JSX or be queried via GraphQL.
Getting started:
- Install Node on your machine (you’re most likely going to need NVM to install the right version, one with node-gyp
compiler eg. v8.10.0)
brew install nvmwill do the trick for you( if you have brew installed) nvm install vX.XX.X- install the npm version specified using nvmnvm alias default vX.XX.X- mark the installed npm as the default versionnpm install -g gatsby-cli- install GatsbyJS CLI globally
Developing your site:
gatsby new my-site- will create a starter projectcd my-site- change the active directory to your websiteyarn developwill start your development Node server at localhost: 8000- You can now develop your site using React, SASS(or Styled Components at your preference), JSX, GraphQL and Markdown
- SEO can be handled as well using a third party library called ‘react-helmet’ that will allow you to set title, meta description and meta keywords for every routed page, among other things
Deploy your site to AWS S3
Here comes the funny part. All of what you just built is going to be transformed into static content at build time, so the whole thing can be pushed to an S3 Bucket right?! Well, yeah, but we have a couple more steps to take in order to make that happen:
- Create a production build using
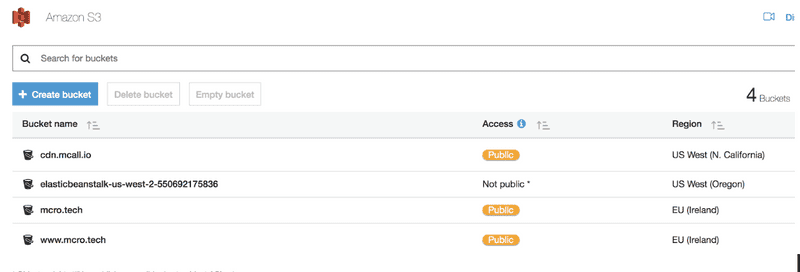
yarn build- this will generate a public/ folder using Webpack, into which the whole minified Javascript, HTML and CSS bundle will end up in. - Create an S3 Bucket on AWS called my-site.com or whatever the domain name will be for your site. It is recommended you make an alias bucket for www.my-site.com as well
- Install AWS-CLI on your machine and setup credentials ( https://aws.amazon.com/cli ).
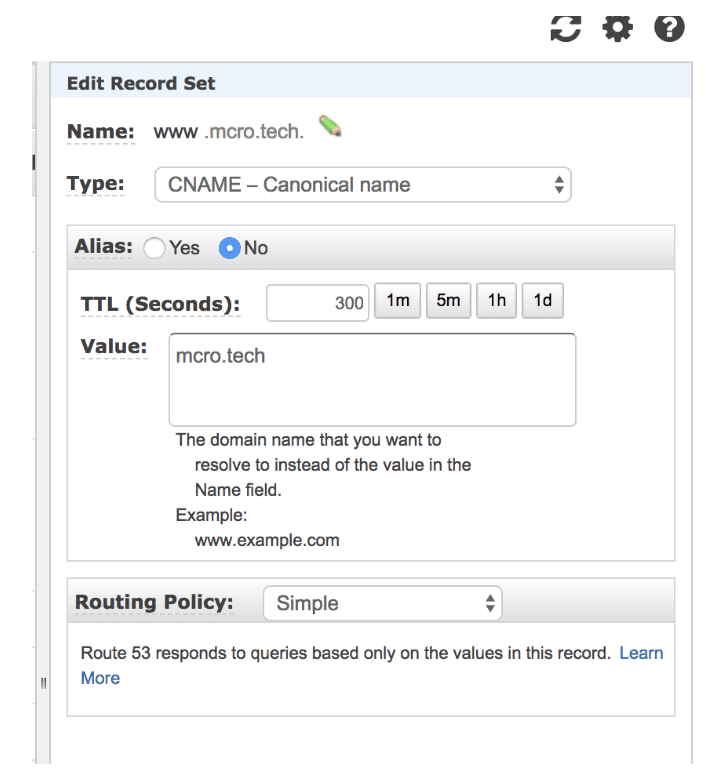
- Now go to Route53 and create a CNAME to match the bucket name
- Create the optimized build using webpack and gatsby
yarn build - Finally upload your static files from /public folder to S3 Bucket using aws-cli:
aws s3 cp public s3://my-site.com --recursive --acl public-readThis will upload files to S3 and will make sure to setup the access control layer to public-read, it will ensure your S3 bucket can be accessed through your domain to public read. - BOOM! - you got your site up and running
The main advantage of deploying to S3 is that there is a very simple build process that takes less than a minute and at the same time your site is auto scalable, secure and highly reliable from all the availability zones. It is a huge advantage that you don’t have to deal with EC2 instances and load-balancers put in auto-scaling groups. You don't have to worry about adding additional costs, regardless you have one user per day, or one million. Using S3 you only pay for what you use, namely the transfer rates from S3 static content.
Final Thoughts
If you are still using Wordpress to serve your company website, maybe it’s time to think about an alternative solution and you’ll find this post useful. In an upcoming post we’ll show you how to use CloudFront to quickly setup an SSL to your S3 hosted website, how to increase the load speed even more and boost your SEO ranking. At the same time how to use Microservices (eg AWS Lambda functions) to handle dynamic forms that need to save data to a database and still not worry about servers, scaling, security and performance.

