Multi-tenant architecture in React Native
Have you ever had to build an an application platform that will serve building several customer apps from the same code base? Instead of duplicating your code and repository several times and then maintain them completely separately, you can use a multi-tenant architecture approach to satisfy your needs.
Implementation
I’m sure there are several ways to accomplish this out there, but one that worked for us uses the following stack: React Native, react-native-config (maybe a forked customized version on need) and Fastlane (to automate your builds).
I’ll start by sharing with you step by step how to set this up, then I will give you the full boilerplate that is stored into our Github.
Initialize your app
-react-native init MultiTenant - will create your basic RN project
-yarn install react-native-config
-Create a tenant configs folder, where every tenant/client will have its own config.
eg. mkdir tenant_config
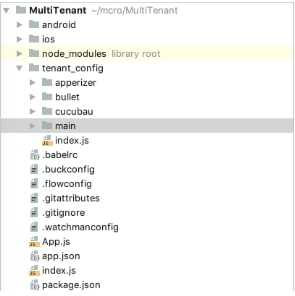
Let’s suppose we have a main app tenant (MultiTenant/Main) and we wanna create these tenants: Apperizer and Cucubau
The folder structure is going to look like this:
Now we need an index.js to export all the desired configs from every tenant, that will look like the following:
import Config from 'react-native-config';

const tenantConfigs = {
   main: require('./main/config'),
   apperizer: require('./apperizer/config'),
   cucubau: require('./cucubau/config')
};

export default tenantConfigs[Config.APP_PIN].default;
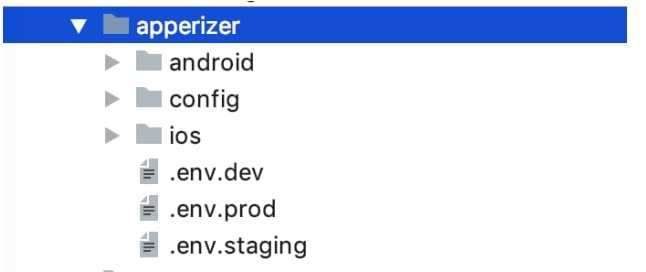
Depending on how deep you wanna go with multiple levels of deployments (dev, staging prod), you can set up a following structure for every tenant:
.env.* files are going to contain native information like APP_ID, APP_NAME, API_URL
The folder ‘config’ should contain configurable information that is shared across iOS and Android that stands for application level configuration.
Setup iOS
First let’s see how to setup the iOS environment.
Setup react-native config:
- Go to your project -> Build Settings -> All
- Search for "preprocess"
- Set Preprocess Info.plist File to Yes
- Set Info.plist Preprocessor Prefix File to ${BUILD_DIR}/GeneratedInfoPlistDotEnv.h
- Set Info.plist Other Preprocessor Flags to -traditional
- If you don't see those settings, verify that "All" is selected at the top (instead of "Basic")
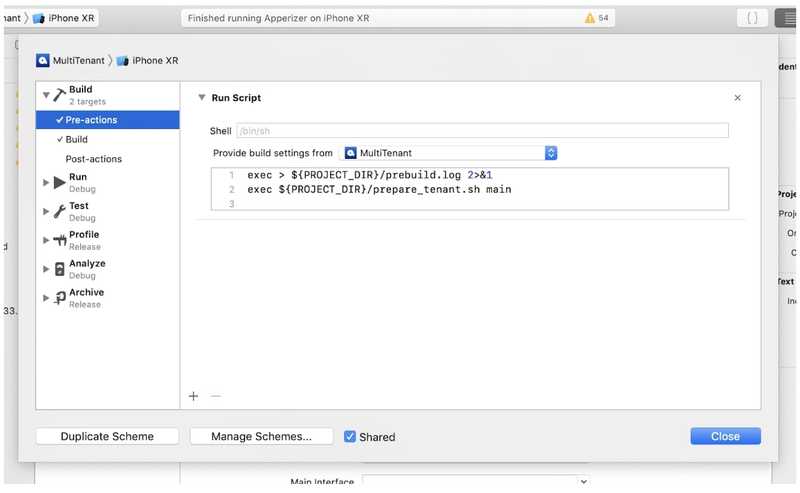
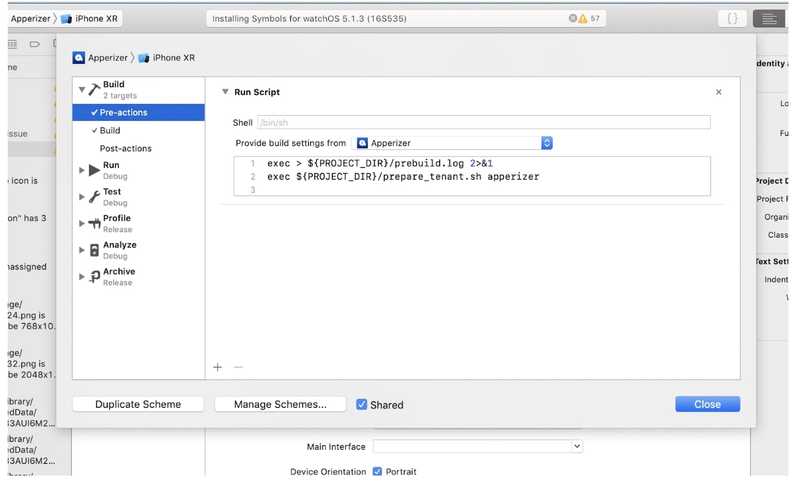
Click on Edit Scheme for your main created target that is MultiTenant. Go to Build>Pre-actions and have the build execute a preprocessed action for the running target:
The prebuild.log file will log the pre-build information and prepare_tenant.sh is going to be the mail shell script that will select the tenant env config and will copy the needed assets in the right place.
exec > ${PROJECT_DIR}/prebuild.log 2>&1
exec ${PROJECT_DIR}/prepare_tenant.sh main
So let’s take a look at what the script does:
#!/usr/bin/env bash
DIR="$( cd "$( dirname "${BASH_SOURCE[0]}" )" && pwd )"
# echo $DIR
DIR=$DIR/..
if [ "$1" != "" ]; then
  tenant=$1
else
  tenant="main"
fi

if [ ! -d "$DIR/tenant_config/$tenant/" ]; then
 # Control will enter here if $DIRECTORY exists.
 echo "#### Tenant specified does not exists ####"
 echo "$DIR/tenant_config/$tenant/"
 exit
fi

# !!! this is very important for setting the right environment variables
if [ "${CONFIGURATION}" == "Dev" ] || [ "${CONFIGURATION}" == "Dev Debug" ]; then
 echo "DEV"
 echo "tenant_config/$tenant/.env.dev" > /tmp/envfile
elif [ "${CONFIGURATION}" == "Staging" ] || [ "${CONFIGURATION}" == "Staging Debug" ]; then
 echo "STAGING"
 echo "tenant_config/$tenant/.env.staging" > /tmp/envfile
elif [ "${CONFIGURATION}" == "Release" ] || [ "${CONFIGURATION}" == "Debug" ]; then
 echo "PROD"
 echo "tenant_config/$tenant/.env.prod" > /tmp/envfile
else
 echo "DEV"
 echo "tenant_config/$tenant/.env.dev" > /tmp/envfile
fi

# copy the right image files to the right icon set
source=$DIR/tenant_config/$tenant/ios/AppIcon.appiconset/*

destination=$DIR/ios/MultiTenant/Images.xcassets/"AppIcon.appiconset"
rm -rf $destination/*
mkdir -p $destination
cp -Rf $source $destination

# copy the right launch screen image files to the right launch image set
sourceL=$DIR/tenant_config/$tenant/ios/LaunchImage.launchimage/*
destinationL=$DIR/ios/MultiTenant/Images.xcassets/"LaunchImage.launchimage"
rm -rf $destinationL/*
mkdir -p $destinationL
cp -Rf $sourceL $destinationL
echo "Pre-build has executed successfully!"
It’s basically selecting the tenant, copying the app icons, app launcher images and setting the right environment for the specified tenant.
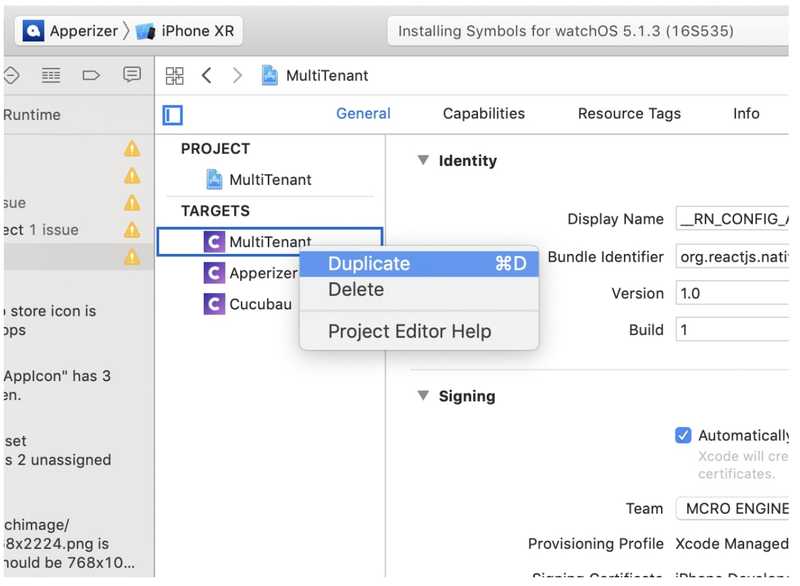
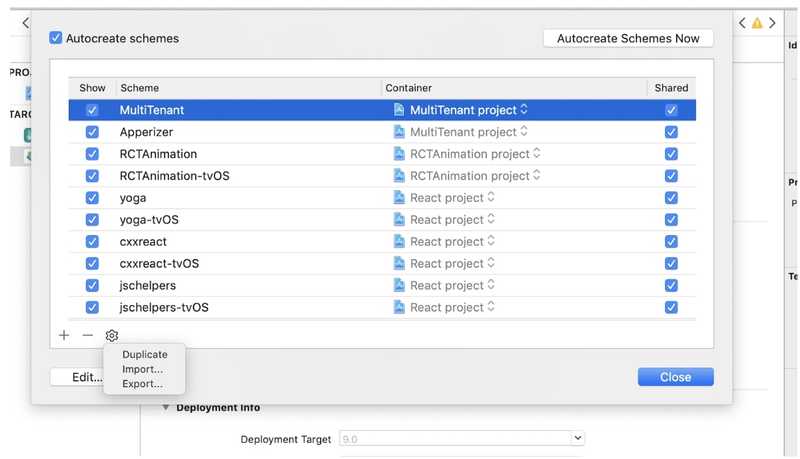
In order to create a new tenant, you can duplicate an existing Schema, modify the pre-build running script and pass a new tenant as the argument, but it’s recommended that you duplicate an entire Target.
Now you’re going to perform the following actions:
- rename the Target to desired name eg. Apperizer.
- remove Schema created together with it (“MultiTenant Copy”)
- create new Schema that is a duplicate of MultiTenant that will take all the configuration
- rename schema as your tenant want to be named (eg. Apperizer)
- Edit the Schema you just created and modify the pre-build script param to match the tenant you created in the config
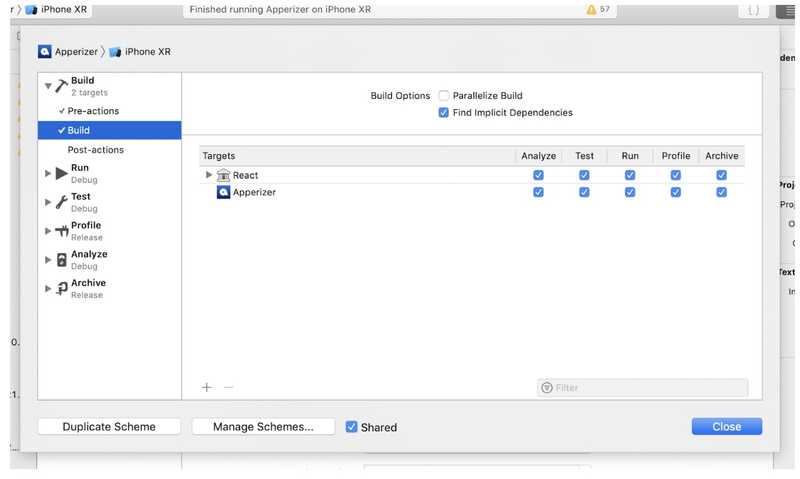
- Now remove the Target from Schema and only leave the tenant specific target you wanna build; every schema will basically have its own target. Also, make sure the Schema is Shared so that it will also be committed to the actual repository
Congrats! You got the new tenant fully setup. You’re good to set more configs within the app and customize it according to your needs.
Setup Android
For Android we’re also going to need a preparation tenant script that will look like the following prepare_tenant.sh:
#!/usr/bin/env bash
DIR="$( cd "$( dirname "${BASH_SOURCE[0]}" )" && pwd )"
# echo $DIR
DIR=$DIR/..
if [ "$1" != "" ]; then
  tenant=$1
else
   # default tenant if none is specified
  tenant="main"
fi

if [ ! -d "$DIR/tenant_config/$tenant/" ]; then
 # Check if $DIRECTORY exists and throw exeption if it doesn't .
 echo "#### Specified Tenant does not exists ####"
 exit
fi

# copy the right image files to the
source=$DIR/tenant_config/$tenant/android/res/
destination=$DIR/android/app/src/main/res/

rm -rf $destination/*

cp -Rf $source $destination

echo "Pre-build has executed successfully!"
The script will copy all the application resources from the specific tenant configuration folder to the main application builder. This includes all the icons, splash screens and settings .xml files. Now to enable react-native-config you will have to add on the second line of app/builder.gradle:
apply from: project(':react-native-config').projectDir.getPath() + "/dotenv.gradle"
You can either use ENVFILE or, alternatively, you can specify a project extension within build.gradle.
project.ext.envConfigFiles = [
    debug: ".env.dev",
    release: ".env.prod",
    otherCustom: ".env.staging",
]
We recommend you use command line env variable ENVFILE, otherwise you won’t be able to specify the tenant at build time and you will have to manually configure it for every build inside build.gradle.
cd android
ENVFILE=../tenant_config/{tenant}/.env.{env} ./gradlew assemble{Configuration}
ENVFILE=../tenant_config/apperizer/.env.prod ./gradlew assembleRelease
In order to have the preprocessor script run before building the actual app in order to copy all the resources over, we need to add this task in app/build.gradle
task prepareTenant(type: Exec) {
    workingDir "$buildDir/../.."
    commandLine "sh", "$workingDir/prepare_tenant.sh", project.env.get("APP_PIN")
}
preBuild.dependsOn prepareTenant
One thing that you may need to keep in mind is that you will have to keep the 4.4 version of gradle and downgrade to Java 8.
https://www.oracle.com/technetwork/java/javase/downloads/jdk8-downloads-2133151.html
We’re good to go with Android now!
Final thoughts
Multi-tenant may not always be an option for you. If the applications are very similar and you don’t have a lot of differences in terms of UX and data, you can definitely use this approach. You will also need to keep in mind that Apple reviewed their terms and conditions for accepting applications to their App Store. This means that very similar applications applied for the same set of customers and that go to the same Apple Developer Program may be rejected when submitted for review. It’s recommended that you do your research before moving forward with this effort.
A full boilerplate you can find and clone from our Github: https://github.com/MCROEngineering/react-native-multitenant-boilerplate
Stay tuned! We’re preparing another article which will cover Fastlane setup with AppCenter.
